Learning Architecture with Quizlet

Quiz #1 Study Set for AHI/ARC 103 CC: Building Culture.

One aspect of my Tech Fellows project has involved using Quizlet.com in two of my courses, AHI/ARC 103 CC: Building Culture and AHI 277: 20th Century Architecture and Design. Students in both of these classes take periodic “slide quizzes” in which I give them a list of 20 or so buildings to learn, memorize, and identify. In the past, the students were responsible for making flashcards of images and architectural drawings and memorizing the identification information. This was always a bit of a challenge for students, as they needed to take images from the pdfs of my powerpoints posted on Moodle and then print the images to make flashcards. I always saw this as a bit daunting of a task, but it seemed somewhat easier than the way I had to make flashcards in college, which involved photocopying images from books.

During Tempel Summer Institute last year, I decided to re-think the resources I provided for students to study for these quizzes. With the help of Laura Little, I found that Quizlet.com would be a great solution. What I found most advantageous about the website was that I could give the students the images I wanted them to learn, which meant that more emphasis could be placed on plans and sections, which students struggled with the most in the past.

Quizlet.com is available for free to teachers and students. I opted to sign up for a one year-subscription, which enabled me to upload images to my study sets and view student progress. Using Quizlet is very simple and I have additionally found that many students are using the website for other courses or are creating study sets for their own use. Another feature of Quizlet is their mobile app, which allows students to study on their phones and tablets.

Having used this website for two courses this year, I have found that students’ quiz grades are higher, there has been less anxiety over studying for the quizzes, and I am able to track students’ progress. I have also been able to achieve one of my main pedagogical aims for the courses – having students gain greater fluency with reading architectural plans, sections, and elevations.

Here are a couple of images of my study sets for AHI/ARC 103 CC: Building Culture:

Midterm Exam Terms for AHI/ARC 103 CC: Building Culture. For this study set, I was able to provide images that supplemental the definition of each term.
Midterm Exam Terms for AHI/ARC 103 CC: Building Culture. For this study set, I was
able to provide images that supplemental the definition of each term.


One of my favorite features of Quizlet.com is the “scatter” feature. This tool allows students to match terms or building identification with their definition or associate images. Students have commented on how helpful this feature is in the initial stages of studying.
One of my favorite features of Quizlet.com is the “scatter” feature. This tool allows
students to match terms or building identification with their definition or associate
images. Students have commented on how helpful this feature is in the initial stages of studying.


Guidelines for Student Photographs

I have been developing a series of workshops using Legos for AHI/ARC 103 CC: Building Culture, which I will teach this spring. During the workshops, groups of students will make a series of small architectural models using Legos and photograph their work to share it with the rest of the students in the course.

In preparation for a Technology Fellows Program (TFP) workshop this fall, it was suggested that I think about developing guidelines for the students that would explain how to photograph their models. While most students are consistently taking snapshots on their phones and tablets, they usually don’t consider how to take a better quality image. Diane Creede also noted that in a book I was using for inspiration, all of the models were shot on dark backdrops, which made the Lego models stand out. To prepare for a trial run-through of my assignment at the TFP workshop, I made a series of black backdrops for the students to use and developed the following photography tips.

Image_01

This list of tips, along with the black cardboard backdrops, allowed for the workshop participants to take high quality photographs using their smartphones that could then be uploaded to Moodle for sharing. The list of tips enabled the participants to photograph their models on their own by following the guidelines and create remarkably consistent images across the different groups. I’m very much looking forward to using these guidelines with my students next semester.

This slideshow requires JavaScript.

Technologies for Making Appointments and Learning Student Names

As a Technology Fellow, I have been working to find ways to incorporate new technologies into my classes and assignments. With the semester about to begin, I wanted to share two simple technologies that have consistently been saving me a lot of time and frustration. While the first simply limits the number of emails in my inbox (using Google Appointment Slots), the second can have a major impact in the classroom and the relationships you form with your students early in the semester (learning their names quickly).

Google Calendar Appointment Slots

I use Appointment Slots in my Google Calendar to have students sign up for office hours and appointments with me. Instead of students emailing me to sign up for an appointment when they can’t come to my office hours, they click on a link that I post on Moodle and in my email signature (thanks Anthony Graesch for this great tip!), and can see my availability and sign up for an appointment that works for their schedule. Last year, Jessica McCullough, wrote this Engage Blog Post with two videos that walk you through how to use Google Appointment Slots.

Learning Student Names by Taking Attendance with Roll Call

Learning the names of my students has often been a challenge for me. With the beginning of each semester and endless to do list, I often felt that it was taking me far too long to learn my students’ names. I had tried numerous approaches to learning names and faces, including using name tags in class and downloading their pictures from Moodle, but often found these strategies lacking. In particular, using the Moodle photos was challenging since their photographs were often a few years old and never seemed to look like the students sitting in front of me.

About a year ago, I began looking into a way to tackle this issue. In searching for an easy to use application, I came across Roll Call, an App for iPad that has made both learning my students’ names and taking attendance much easier. The App costs $1.99, and is very intuitive and simple. It now takes me no more than a few class meetings to learn everyone’s names, just by taking attendance using their photos.

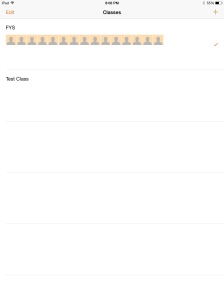
When you open the App, you simple click on the “+” at the top right corner to create a new class. After entering the name of the class, a new class appears on the App’s main screen. (Click on images to see a larger version)

Image_01

If you tap on the class, a new page opens:

Image_02Image_03


Here, click on the “+” on the bottom right corner to add new students to the class. I only use the “first name” and “last name” fields.

Image_04

I enter all of my students’ names before the first class meeting, so that on the first day of class, the students can take pictures of themselves and add them to the App. I ask the students to pass around my iPad and take their own photos. To do this, they simply click on their name, which opens a new page. Then they click on the “Edit” icon at the top right. Finally, they click on “Tap to Edit” on the blank photo and select “Take Photo” from the menu.

Image_05Image_06

Image_07

This opens the iPads’ camera and the students can take their photo, and save it by choosing “Use Photo” (they usually have their neighbor take their photo for them).

Image_08Image_09


Once all the students have entered the photos, you can begin using the App to learn their names as you take attendance. On the screen for the class, the students are by default listed as “Absent” and their photos will appear in black and white. By choosing “Today” at the bottom of the screen, you can set the correct date.

Image_10Image_11


After setting the date, choose “Roll Call” at the bottom of the screen. This will open the “Roll Call” screen, and as you click on each student’s photo, they will be moved to “Present” and will now appear in color. Once you have taken attendance, choose “Done.”

Image_12Image_13


You can keep track of your attendance by clicking on the “Reports” icon at the bottom of the screen, setting the dates you want to review, and clicking on “Preview”.

Collaborating with Students & Shared Google Folders

This semester, students in my course ARC 231: Interiors of Connecticut College, were tasked with working collaboratively and to find ways to effectively and efficiently share their progress with one another. From my initial course planning and development, I knew that this would be a challenge, especially considering that for the first two projects in the course, the class would be working with students in Andrea Wollensak’s course ART 208: Object and Environment.

Andrea and I applied for and received a DELI grant for iPads for every student in the two courses. While the iPads would help them create content, we envisioned them as a tool for collaboration. We decided early on that we would use Google Drive on the iPads to enable the students to share their work during the course of each project.

For each project, I set up shared folders for the project with subfolders for each group. As someone who uses a detailed file structure on my personal computer and also on Google Drive, I came to this course thinking that students would be able to develop ways to organize their files without instruction. A few weeks into the first project, I began to realize that many students were struggling to use Google Drive and were having trouble keeping track of different iterations of a given document or file. In talking with the students, it became clear that many of the students hadn’t really thought in-depth about how they organized their files. Even those students in my class who used an organizational system, used ones that were quite simple.

The shared Google Drive folder for my class

Once these challenges became apparent, I spent time in class for a discussion on how to use Google Drive and about best practices for naming and organizing files.  This was an extremely productive conversation and got the students to begin thinking about how they organize their work. By the time we began our third project in the course (in which my students were working collaboratively as a class with three sub-groups) they were all effectively using Google Drive and sharing their work.

The shared “Project 2” folder for my class with individual folders for each document
The shared “Project 2” folder for my class with individual folders for each document.

I have put together some Tips and Recommendations based on my experience this semester.

Tips and Recommendations

  • Don’t assume that students know how to use Google Drive. When we discussed using Google Drive before the project was underway, I asked if they knew how to use it and if they needed help, and the response I got, was “Yes, it’s easy. We’re good.”
  • Use a Shared Class Folder in Google Drive. Once you create a shared folder for you class, every document placed in the folder can be viewed by those that you have given access to.
  • Plan time in-class to discuss file naming and file structure. This is probably the biggest challenge, since students need this information in order to work effectively, but are also reluctant to let you know that they need help.  In a group project, it’s important to come up with a system for naming files and especially for naming files that have been edited and updated.  While Google Drive allows you to easily search for a file, you need to know the name of the file you are looking for. When working in a group with newly created content, it’s really challenging to find something if you don’t know what exactly you are looking for – having a folder as a repository can work much more effectively.
  • Keeping Everyone Accountable with a Google Document Log. Accountability is a common concern (and issue) for collaborative student projects. By the time the third project began, I created a “Project Log” and the students were required to make individual to do lists and update them at least once a week. I monitored this site consistently and it worked very well to make sure that each member of the sub-groups were pulling their weight.
  • Monitor the Shared Project Folders. I found it particularly important to monitor the shared project folders. While this didn’t occur on a daily basis, I consistently checked in to see who was doing what and when. If students weren’t keeping up with sharing their work, I would often send an email to encourage them to get more engaged.

There were some common problems that students had when we initially began using Google Drive and Shared Folders. I would recommend going over the following at the outset of a project with the entire class:

  • Signing into Google Drive. In order to track who edited a document, it’s important that everyone is signed into their Google account (and not listed as “Anonymous”).
  • Finding the Shared Folders and Locating Shared Files. Providing an overview of the folder structure can avoid confusion later.
  • Adding the Shared Folder to their own Google Drive. By right-clicking on a folder and choosing “Add to My Drive,” students were able to easily find the shared folder in their own Google Drive (this is much easier than searching the “Shared With Me” folder.)
  • Keeping Newly Added Files Organized. This was an ongoing concern and I would “clean-up” file names and organization on a weekly basis. (You could certainly assign a student to do this task).